Bedrock Edition¶
Minecraft Bedrock Edition is the Minecraft version for Windows 10, IOS, Android, PS4, Xbox One and Switch.
It’s programmed in C++ and uses the Bedrock Engine to unify all the platforms
Every player must have an Xbox account to be able to play online. The username in the Xbox account is the player in-game tag.
Bedrock Server Software¶
Like the Java Edition, there are forks or modified minecraft servers for Bedrock Edition apart from the official one.
The improvements they offer are plugins support and better performance.
I used Nukkitx, coded in Java, compatible with the latest Minecraft versions and also offers nice performance.
Deployment¶
The Nukkitx server is going to be hosted in a CentOS 8 container.
Its only requirement is Java 8, which I installed with
dnf install java-1.8.0-openjdk-headless.x86_64.The Nukkitx server file can be downloaded from Jenkins here and to run the server just execute
java -jar nukkit-1.0-SNAPSHOT.jar.It will generate automatically all the server files and folders. The most important config file is the server.properties that I edited like this.
#Properties Config file
#2020-05-20 03:03:33
motd=⚡ §9M§ba§as§et§6e§cr§dS§9e§br§av§ee§6r ⚡
sub-motd=⚡ §9M§ba§as§et§6e§cr§dS§9e§br§av§ee§6r ⚡
server-port=19132
server-ip=0.0.0.0
view-distance=12
white-list=off
achievements=on
announce-player-achievements=on
spawn-protection=16
max-players=20
allow-flight=off
spawn-animals=on
spawn-mobs=on
gamemode=0
force-gamemode=off
hardcore=off
pvp=on
difficulty=3
generator-settings=
level-name=world
level-seed=
level-type=DEFAULT
allow-nether=on
enable-query=on
enable-rcon=off
rcon.password=hYTliYzdmO
auto-save=on
force-resources=off
xbox-auth=on
The settings are pretty much the same as the Java version for PC. The main difference here is that xbox-auth must be turned on for people to play with their Xbox account and also the IP must be 0.0.0.0. If it’s set to the actual private IP it won’t work at all.
After running the server for the first time it will fail since the EULA must be accepted. Change the EULA=false into EULA=true so the server can actually run.
Plugins¶
Nukkitx supports its own plugins. All of them can be found here.
- Player Analytics; Uses a local MySQL database to store the server stats and display them in a web GUI
- SimpleScoreboards; Uses the ScoreboardAPI and PlaceholderAPI to create a customizable scoreboard
- KDR; Kills and deaths placeholders, dependency of SimpleScoreboards
- MobPlugin; Adds AI to mobs [1] , spawning and spawners
- EssentialsNK; Adds multiple managing and user commands like /home or /warp
- ServerMail; Adds mail commands to send messages to offline players so they can read them when they log back in
Plugins are placed in the plugins folder inside the root server folder and used the next time the server is launched.
I configured Player Analytics and SimpleScoreboards. The rest are good to go with the default configuration.
Player Analytics¶
Player Analytics uses geolocations to view players info like the ping. Also, in the server.properties the IP is set to 0.0.0.0 so the Alternative IP string must be set to true and specify the web GUI address in the Address: string with the IP:%port% format. The edited config.yml file looks like this.
Webserver:
    Port: 80
    Alternative_IP: true
        # %port% is replaced automatically with Webserver.Port
        Address: 192.168.0.113:%port%
    # InternalIP usually does not need to be changed, only change it if you know what you're doing!
    # 0.0.0.0 allocates Internal (local) IP automatically for the WebServer.
    Internal_IP: 0.0.0.0
    Security:
        SSL_certificate:
            KeyStore_path: Cert.jks
            Key_pass: default
            Store_pass: default
            Alias: alias
        # HTTPS is required for Login.
        Disable_authentication: false
        # Cross-Origin Resource Sharing (Requests from non-Plan web pages)
        # https://developer.mozilla.org/en-US/docs/Web/HTTP/CORS
        CORS:
            Allow_origin: "*"
    Disable_Webserver: false
    External_Webserver_address: https://www.example.address
# -----------------------------------------------------
Data_gathering:
    Geolocations: true
    # Please accept the EULA to download GeoLite2 IP-Country Database
    # https://www.maxmind.com/en/geolite2/eula
    Accept_GeoLite2_EULA: true
    Ping: true
    Disk_space: true
    Commands:
        Log_unknown: false
        Log_aliases_as_main_command: true
SimpleScoreboards¶
To change the default scoreboard just edit the plugins/SimpleScoreboards/config.yml file.
The scoreboard only allows one title.
Text colors and formatting use the Minecraft Formatting/Color codes, which can be found here.
Placeholders can be used to output multiple variables in the scoreboard. A list can be found here.
The final config.yml file looks like this.
# Config version, do not edit
version: 2
# How often scoreboard should be updated in ticks (20 ticks = 1 second)
# 0 = disabled, ENABLE THIS IF YOU USE PLACEHOLDERS
# With coordinates 10-20 recommended, with other placeholders 80-200
update: 20
# Use async task to update scoreboard
# Less server load but may lead to errors
async: true
# Scoreboard title
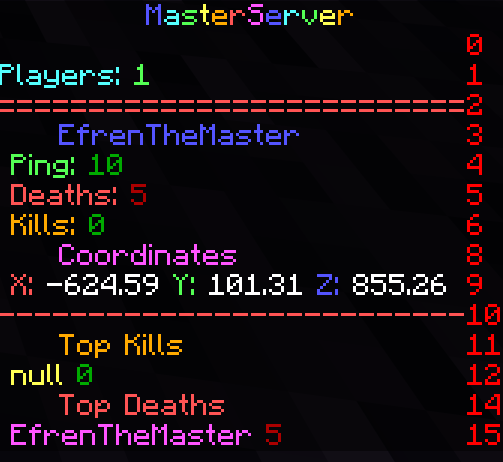
title: "§9M§ba§as§et§6e§cr§dS§9e§br§av§ee§6r"
# Scoreboard lines
# You can use § for colors and placeholders from PlaceholderAPI
text:
- ""
- "§bPlayers: §a%server_online%"
- "§c=========================="
- " §9%player%"
- " §aPing: §2%player_ping%"
- " §cDeaths: §4%kdr_deaths%"
- " §6Kills: §2%kdr_kills%"
- ""
- " §dCoordinates"
- " §cX: §f%player_x% §aY: §f%player_y% §9Z: §f%player_z%"
- "§c--------------------------"
- " §6Top Kills"
- " §e%kdr_topkillsplayer% §2%kdr_topkills%"
- ""
- " §cTop Deaths"
- " §d%kdr_topdeathsplayer% §4%kdr_topdeaths%"
- ""
The result looks like this.
How To Play¶
Xbox One¶
- Go to System, then Settings, Network Settings, Advanced Settings, DNS Settings, Manual. When Primary DNS is prompted, type in 104.238.130.180. For the second DNS you can use any you want, like 1.1.1.1.
- Launch Minecraft and Tap Play, go to the Servers tab and choose any server.
- A new server list will be prompted. Tap Connect to a Server and enter masterserver.serveminecraft.net in the Server Address dialog box.
Nintendo Switch¶
- Go to System Settings then Internet Settings. Choose your network and go to DNS Settings. Set it to Manual and type in the primary DNS 104.238.130.180. For the secondary DNS you can use any you want, like 1.1.1.1.
- Then launch Minecraft and tap Sign In With A Microsoft Account and login with the Xbox account. Tap Play, go to the Servers tab and choose any server.
- A new server list will be prompted. Tap Connect to a Server and enter masterserver.serveminecraft.net in the Server Address dialog box.
PS4¶
PlayStation hasn’t released public servers yet.
One way to join another server is through friends; Someone you have as friends in your Xbox account plays on their world and allows other players to join it. The problem of this is that the owner must be online for other people to be playing. If the owner leaves the world, the rest of the people playing it will be kicked.
It also allows joining LAN Bedrock servers, but not WAN ones.
The easiest way to join a Bedrock Edition server from PS4 for now is launching a LAN PocketMine-MP server and then joining a WAN server.
- Installing PocketMine-MP is easy as searching it in the PlayStore and installing it.
- When it’s installed just tap Start and in the server console do op “playertag”. That way operator permission will be granted to perform any command
- Then do /gamemode creative to be in creative mode and finally /transferserver masterserver.serveminecraft.net to join the MasterServer
Footnotes
| [1] | Minecraft Monsters |